梦境
内容:苏州旅游 听周密的livehouse 他又忘词了但是全场很嗨中场休息大家去自助奶茶区打饮料(茉沏) 遇到一个小姐姐是本地人 对我起级好 给我打奶茶加料超丰富 还加了很多奶盖 就这样认识了后面逛街又遇到 她邀请我一起去吃饭到了饭桌上 把我的朋友安置好 她带我出去买当地小吃 还吃了一种活的虫子 有点可怕 我不太敢 还沾到了手上 后来我们回到餐桌上 发现她爸妈来找 让她相亲她拿我当挡箭牌 说我俩已经在一起了(?)她爸妈也接受 但是那位相亲对象不同意了 开始砸场子 我俩就往外面跑冲上了一辆公交车 她还在公交车上被非礼 我想要帮忙却发现自己动不了只好大声呼救 大家好像都听不见也看不见后来有一位男士制止了 但是我们下了车之后就一直被他尾随 我偷偷用手机拨了紧急呼救 然后拉着她逃入小区的一栋单元楼一楼好像是监狱一样的地方 窗户密不透风 还被磨砂纸贴上 我隐约感觉这是那位尾随者的老巢(怎么这么巧) 二楼像是一个农家饭店门虚掩着 推开进去后有一位老板躺在沙发上睡觉 我们假装提出要吃饭 想在此避避 进入包厢后 外面响起敲门声第六感告诉我这位老板和尾随者认识并且楼像是一个农家饭店门虚掩着 推开进去后有一位老板躺在沙发上睡觉 我们假装提出要吃饭 想在此避避进入包厢后 外面响起敲门声第六感告诉我这位老板和尾随者认识并且会暴露我们的行踪,于是借由卫生间逃离 奇怪的是卫生间的窗外就有一架木质电梯木板有些老旧 发出咯吱咯吱的声音 我们上去之后发现只有唯一一个关门的按钮电梯中途停在了6813楼每层都有一个面目狰狞的男人盯着我们并想要进来 我们疯狂按关门的按钮最终电梯停在了一楼这时 她的父母赶来与她发生了争执 从他们的话语中我了解到所有的这一切都是她妈妈安排的(?)后面记不得了 最终警方追踪我的定位 将她妈妈抓获
根据弗洛伊德的梦境分析理论,你的梦境可能包含了一些象征和隐含的意义,可能反映了你内心的欲望、冲突和焦虑。让我们逐步分析这个梦境的各个元素:
- 苏州旅游和Livehouse: 这个部分可能代表你对冒险和新经历的渴望。Livehouse的现场可能反映了你对娱乐和享乐的渴望,而歌手忘词可能表示你对一些不完美或困难情况的担忧。
- 自助奶茶区和小姐姐: 自助奶茶区可能象征着你对选择和控制的欲望。小姐姐可能代表你在新环境中遇到的友好支持,可能反映了你的社交需求。
- 吃活虫子: 这个情节可能反映了你对某些事情的不安和抵触,可能与某些经验或情感有关。
- 相亲和挡箭牌: 这一部分可能涉及到你对亲密关系和承诺的恐惧或矛盾。被当作挡箭牌可能表示你可能被卷入一些关系中,而你不太愿意。
- 被尾随和危险追踪: 这部分可能反映了你的不安全感和对威胁的担忧,可能是来自外部或内部的威胁。
- 电梯和6813楼: 电梯和楼层的变化可能代表你情感上的波动和内心冲突。6813楼的数字可能有特殊的象征意义,也可能与你生活中的某些事件或经验有关。
- 她的父母和警方: 这个部分可能反映了你对权威和保护的需求,也可能涉及到你与家庭和社会的关系。
最终,根据弗洛伊德的理论,梦境是一种表达潜意识冲突和欲望的方式。这个梦境可能反映了你在情感和社交方面的一些内心挣扎和焦虑。要更深入地理解这个梦境,你可以考虑与心理专业人士交谈,他们可以帮助你探索与梦境相关的情感和体验,以及它们在你生活中的潜在意义。
- 苏州旅游和Livehouse: 这个部分可能代表你对冒险和新经历的渴望。Livehouse的现场可能反映了你对娱乐的渴望和音乐的兴趣,而歌手忘词可能表示你对一些不完美或困难情况的担忧。
- 自助奶茶区和小姐姐: 自助奶茶区可能象征着你对选择和控制的欲望。陌生小姐姐在新环境中提供了友好支持,可能反映了你的社交需求,在陌生环境中寻找帮助和指导的渴望。
- 吃活虫子: 这个情节可能反映了你对某些事情的不安和抵触,可能与某些经验或情感有关。
- 相亲和挡箭牌: 这一部分可能涉及到你对亲密关系和承诺的恐惧或矛盾。被当作挡箭牌表示你可能被卷入一些关系中,而你也许不太愿意。
- 被尾随和危险追踪: 这部分可能反映了你的不安全感和对威胁的担忧,可能是来自外部或内部的威胁。
- 电梯和6813楼: 电梯和楼层的变化可能代表你情感上的波动和内心冲突。6813楼的数字可能有特殊的象征意义,也可能与你生活中的某些事件或经验有关。
- 她的父母和警方: 这个部分可能反映了你对权威和保护的需求,或者你感到有人会为你解决问题。也可能涉及到你与家庭和社会的关系。
给我的宝宝画心形图:
绘制心形图的轨迹
用Python的标准库中包含的Turtle绘图模块绘制:
import turtle as t |
用文字构成心形图案
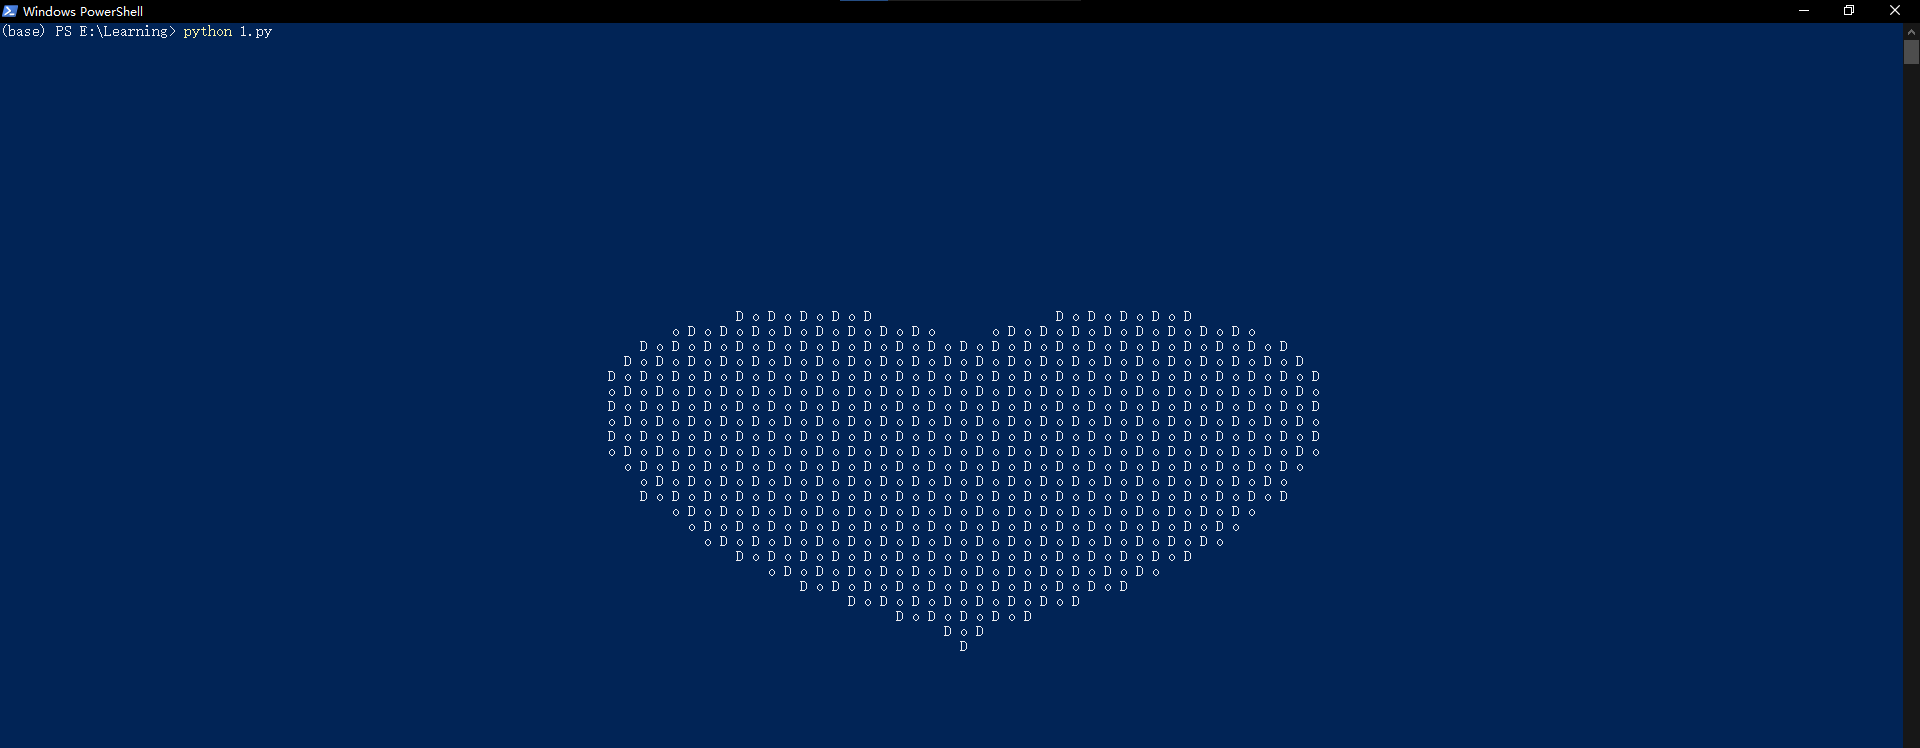
简单的文字构成图
print('\n'.join([' '.join([('DoDo'[(x-y) % 4]if((x*0.05)**2+(y*0.1)**2-1)**3-(x*0.05)**2*(y*0.1)**3<=0 else' ')for x in range(-60,60)])for y in range(30,-30,-1)])) |
输出如下:
用图片构成心形图
首先要裁剪图片到相同大小:
from PIL import Image |
然后将图片排列在大的画布上
import cv2 |
用列表绘制心形
from PIL import Image |
待完成:
- 将大画布改为心形,
- 并且使图片边缘裁剪平滑
找房子(香港)
香港粤海酒店 Oasis Avenue, 18 Prat Ave, Tsim Sha Tsui, Hong Kong